Wednesday, 24 February 2016

221. Window Decoration

Staedtler Fineliner 0.05 pen, W&N waterolours
in Stillman & Birn Alpha sketchbook, 8.5" x 5.5"

My friend and I had a pot of tea each a couple of weeks ago and, as we always have some art materials with us whenever we meet - and this tiny little window decoration was looking its best - we got the paints out!

Tuesday, 23 February 2016

220. Vegan Yumminess

Staedtler Fineliner (0.8, I think) and
Faber Castell markers on photocopier paper
Short version:
After I'd written out the ingredients in the dish, I found myself absent-mindedly sketching it so decided to get out my markers and add some colour.

Detail
Explanation:
We're currently in the middle of another Alpha course and each week we give the participants a hot two-course meal so they can come straight from work without worrying about what to eat.

We discovered in week 3 that we have two other vegetarians on board - one had simply written "no pork/beef" under 'dietary requirements' on the registration form but the other had put nothing at all. Consequently, we noticed they were just eating the veg!

We have a great catering team who will turn their hands to anything but guess who forgot to pass on the information?! My excuse is that I was told on my way to do something else. Anyway, I remembered on the morning of Week 4 - in the shower!!! I had a little panic and told my husband (who, unusually, happened to be at home that day) and, in his own inimitable way calmly said "I can cook something if you want…!" He regularly cooks for me - an almost total vegan these days, although he'll eat almost anything (except eggs and black pudding - yuk!) - so we went shopping for fresh ingredients and put this dish together, which he then named "Courgette and Mandarin Cassoulet". We served it with rice.

Our friends adore and regularly request his food (he has a PhD in Biochemistry so has experimented over the years with food and flavours - look at the ingredients!) and this was totally yummy!

Monday, 22 February 2016

219. USK - Sketching the Wallace Collection 2 of 2

Pilot G-Tec C4 pen, W&N watercolours and Tombow brushpen
in Stillman & Birn Alpha sketchbook, 8.5" x 5.5" (x2).

This sketch was done in the Wallace Collection Restaurant with USK London on Saturday. As usual, Katherine made us sketch the fare before consuming it. I don't like strawberries, cream, etc, so just had a pot of (lovely) tea and sketched someone else's cream tea.

The restaurant staff were really encouraging, walking around and commenting on our sketches and we were so pleased they allowed us to paint at the tables (not inside the galleries though!).
One newbie and two regulars - I always love the international flavour of Urban Sketchers London! In our little group of four (above), the only continent not represented was Australasia but I bet further down the table (below), there was at least one. (Almost 20 of the 30+ sketching on Saturday stayed for cream teas.)

Sunday, 21 February 2016

218. USK - Sketching the Wallace Collection 1 of 2

Pilot G-Tec C4 pen, Unipen 0.05 and 0.5 pens and Tombow brushpen
in Stillman & Birn Alpha sketchbook, 8.5" x 5.5"

With Urban Sketchers London at the Wallace Collection yesterday.  Can't believe I only did two sketches all day but I must admit I enjoyed doing this immensely. The more I sketched, the more I saw to sketch, like the reflections in the mirror and all the intricacies in the  gold ornamentation - everything is like that there! As you can see from the photos below, the bottom half of the sketch should should have been longer to prevent the hearth bit looking so stretched widthways but hey… we were 'sketching'!


Monday, 8 February 2016

217. Gift Sketchbook and WIP Pics - LR

Hardbound Sketchbook Gift, 5.5" x 5.5"
(more photos of the finished result are at the bottom of this post)

(There is only one rule in bookbinding:
The grain in the paper, cloth and board must run from head to tail.
City & Guilds)

I'm actually working on five books at the same time and might do a sixth. This is a birthday present and I spent a lot of time wondering what colour to use for the ribbon tie, bookmark and endpapers as there are a few colours in the design that would do. I'm really happy with this green. Below, as usual, are work-in-progress images; to see some other books that I've made, click the 'bookbinding' label to the right.

What's going on here? Making templates for the stitching
One book must suffer so others might live!
The poor Yellow Pages has at least one use in our house -
it saves the furniture (and me) from being stabbed by the awl.

Three of the five text blocks, ready for the stitch holes to be punched.
My handmade Fabriano sketchbook in the background. I'm keeping that one.
Do you recognise the fabric?

You can see the templates for the 'square' and the A5 text blocks.

All the signatures in the text blocks have now been stabbed.
Stitching can commence. (I use waxed thread for added strength.)

Signatures stitched around two pieces of sewing tape and green endpapers added.
Spine glued with archival EVA and bulldogs hold it together for now.
(To see my stitching, see some of the other 'bookbinding' posts.)

When the glue is almost dry, the bookmark is added.

Headbanding added; I may sew my own one of these days!

Mull added for further reinforcement then a green lining strip added on top.

Making the 'case'. Greyboard for the front, back and spine is
measured out then adhered to the book covering with EVA.

Corners trimmed so they fold and tuck in neatly.

Folding before pasting.

Case made and spine creases added for a nice shape.

Slits made in the case, ribbon ties fed through then
the slits hammered closed to lock in the ties.
Archival glue added to ensure the ribbons cannot break free over time.

Magazine paper is as good as glassine paper to ensure 
the endpapers don't stick together in the pressing process.

Boards added on top to protect the book covering and
to keep it all flat during the 12-hour press.

My usual 'stamp' hand-drawn/written.

Close up.

All done - top view.

Finito! Off to bed!

Tuesday, 2 February 2016

216. Pizza and Paint at LCF

Pilot C4 G-Tec pen and Winsor & Newton watercolours in
Stillman & Birn Alpha sketchbook, 8.5" x 5.5" (x2)

Happy February everyone.

Sunday, 31 January 2016

215. At Suzie's

Pilot C4 G-Tec pen and Winsor & Newton watercolours in
Stillman & Birn Alpha sketchbook, 8.5" x 5.5" (x2)

Every so often, our friend Suzie invites some of her painting and musical friends over for an 'art and music' day. She has a collection of red and white crockery and utensils and we cheekily raided her cupboards and laid them out and painted them. I left out a few of the items as I liked this setup.

Friday, 29 January 2016

214. And Then There Were Five

Derwent Charcoal and Schmincke soft pastels on
Clairefontaine Pastelmat, 9.5" x 12"

There were six pears but I ate one! Thank you, Rach!  Don't you love it when you meet with a friend and you end up doing some art together? Have a great weekend, everyone!

(This was my surface today.)

Wednesday, 27 January 2016

213. Pooh Mugs - WIP Pics


Derwent Charcoal and Schminke Pastels on
Daler Rowney Murano paper, 12" x 9.5"

This is all I have time for at the moment. (Charcoals cleaned in the top image; LOL!) More later. Have a good day folks!

Saturday, 23 January 2016

212. Sketchcrawl 23.01.2016

Pilot C4 G-Tec pen and Winsor & Newton Watercolours 
in Stillman and Birn Alpha sketchbook, 8.5" x 5.5" (x2)

Up four flights of stairs(!) and I arrived in the rafters in 'Project Space' (in an art gallery) this afternoon and this is what we did. A complex scene and I made a ton load of errors; nevertheless, I thoroughly enjoyed the afternoon thanks to the Urban Sketchers group in Northampton.

Friday, 22 January 2016

211. Rachel's Mug

Schmincke soft pastels on Clairefontaine Pastelmat, 12" x 9.5"

Who knew that when I logged out of here on Christmas Day that I wouldn't be back for a month?! So, for the first time in years, I've reached Week 4 and not yet posted in Leslie Saeta's '30 in 30' - gasp!

I hope to be back to frequent posting now and I'm looking forward to being able to revisit and comment on the blogs of those of you who have them.

This morning I was with my friend Rachel who has the loveliest mugs - this one a Cath Kidston. I took my pastels with me and she brought hers down so we had great fun painting them!

I love the vibrancy and immediacy of pastels and the way you can get your hands right in there but I also love oils, acrylics, watercolours, pen and ink, graphite, etc. I love them all for different reasons. Do you have a favourite?

Friday, 25 December 2015

210. Another Gift Sketchbook and WIP Pics

Hardbound Sketchbook Gift, 5.5" x 5.5"
(more photos of the finished result are at the bottom of this post)

(There is only one rule in bookbinding:
The grain in the paper, cloth and board must run from head to tail.
City & Guilds)

I have two friends who are 'two peas in a pod'. They call themselves 'Batman' and 'Robin'. Robin has in the last five months discovered she has a previously unrealised gift for art - it's been quite a revelation to us all - her included! Batman thus asked me to make Robin a sketchbook for Christmas that would be small enough for her handbag and also fairly lightweight.

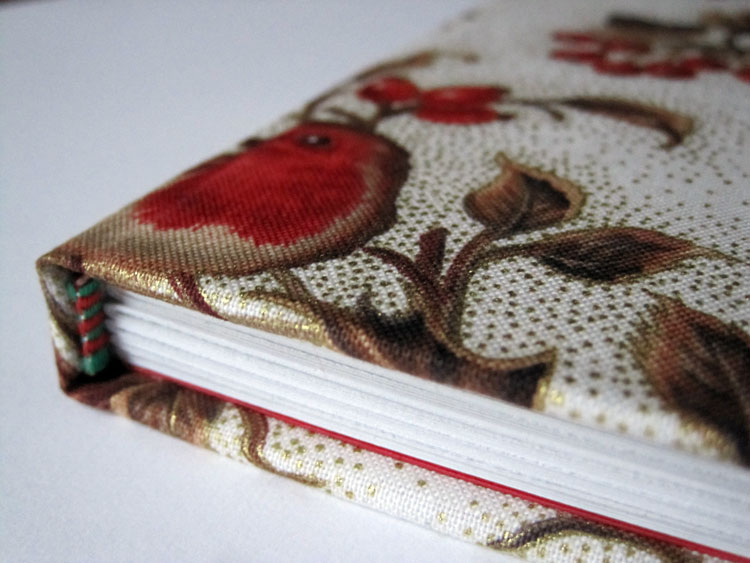
Robin is a wildlife lover and avid photographer and, while we were deciding on the right cover, we came up with the idea of a 'robin' theme. Ordinary paper is not brilliant for book covering; you really need something stronger and flexible enough to fold around board, which is the idea of bookcloth. I found this gorgeous print in a fabric shop in St Albans - the owner has been there for 40 years and I always find what I'm looking for there. I used tissue paper and Bondaweb to turn it into bookcloth (that's bookcloth is made) and the rest is history! 

If you're interested, there are work-in-progress images below. Happy creating everyone!

 After folding and arranging the signatures, I guillotined them into a square format
then stitched them with waxed thread 
using three pieces of  sewing tape for spine strength
 Only six signatures this time (it needs to be lightweight)
Glued between boards then a ribbon bookmark added a bit later
Headbanding added and everything held in place with 
again with rough boards and bulldog clips
A better view of the headbanding (red and green tips)
… snap happy!

After this, I added mull around the spine for strength and also a heavyweight paper spine.
(I omitted to photograph them but you can see mull and a spine in my November post - or click "Bookbinding" in the 'Labels' list on the right and it'll take you there.)
Homemade bookcloth with boards and spine measurements marked on the reverse.
Aligning the grain in each case, I made the bookcloth using a layer each of the strong
cotton fabric, Bondaweb and white tissue paper (ironed as per the instructions).
This ensures no glue seeps through onto the fabric part of the bookcloth.
The right side of the bookcloth.
(Grain direction marked with arrows on the boards.)
I made the 'case' and scored the two spine seams with a bone folder.
Then, with a knife, I cut two slits an inch from the edges and eased the ribbon through. I hammered the slits back into place so the ribbon was taut and the boards flat again. Finally, I glued the entire length of each ribbon onto its corresponding board to ensure it will not break free over time. 

At this point, I attached the red endpapers to the text block then visited my lovely printer who chopped the edges of the text block for me. Not only does it make it look neat
but it is easier to flick through the pages if the sheets are aligned.
I then attached the endpapers to the case.
(This is the back one - the text says "Stitched and bound by Sharon Veares")
A few pics before it's given a 12-hour press
… it's just showing off now...
 It's tired now - all that modelling!
I untied the bow and moved the ribbons and the bookmark out of the way of any glued parts before placing boards on top and underneath for pressing.
Glassine paper (or the like) between the endpapers ensures that any 
undetected glue spots won't stick them together in the pressing process.

It's finished!
The top
The top (again)
The bottom
The back cover
The front cover.

The size had to be specific so I am really, really pleased that the pattern ended up just as she wanted it - on both the covers - quite frankly, as this time the cover is one continuous piece, it's a miracle!

(I can't risk posting this until Christmas Day, just in case…..)